• Skip to primary navigation
  • Skip to main content
  • Skip to footer
  • Login
  • Join OPA

OPA - Oil Painters of America

CREATING COMMUNITY ADVANCING SKILLS ELEVATING EXCELLENCE

  • About
    • Mission, Policies & Bylaws
    • Board of Directors
    • Presidential History
    • History
    • Staff
    • FAQ
  • Membership
    • Membership Information
    • Membership Directory
    • Contact Membership Department
  • Exhibitions
    • Rules and Policies
    • National Exhibition
    • Virtuosos of the OPA
    • National Salon
    • Award Winners
    • Summer Online Showcase
  • Programs
    • Lunch & Learn
    • The OPA Blog
    • Scholarships
    • Critiques
    • Have A HeART Humanitarian Award
    • Ship and Insure Info
  • Community
    • Events & Paint Outs
    • Directory
    • Workshops
    • Brushstrokes Newsletter
  • Shop
  • Sponsorship
    • Current Sponsors
    • Sponsorship Opportunities
    • Make a Donation
  • Show Search
Hide Search

Lori Putnam

The Art of Gradation

Lori Putnam · Jan 19, 2015 · 5 Comments

One of the more overlooked technical devices in creating a painting with sophisticated interest, is gradation. Although it is easy to think of gradation in terms of color or value, by extending your gradation vocabulary in all aspects of the work you can add interest, excitement, passive and active passages, elicit specific responses from viewers of the art, and produce paintings that invoke mood, time, and feeling in a more calculated way.
COLOR AND VALUE
Before we look at more advanced ideas, let’s look at a few common examples of using gradated color and/or value in the landscape. If you paint landscapes, you may have been taught to apply gradation of lighter to darker or warmer to cooler in a large expansive sky. Not being one to fall back on formulas, I suggest my students begin to recognize when this truly happens in nature, at what times of day and with which specific colors and values rather than automatically reverting to this concept in every single case. Sometimes the sky may also gradate from warm to cool (or vice versa) as it spans from left to right rather than from horizon to Zenith. Learning which of these devices to use to convey a specific idea can strengthen your landscapes and keep them from all looking the same.

Gradation of color and value can also be useful when painting other subjects. In a still life, for example, you might use a gradation in the background from left to right and from top to bottom. Notice in this quick head sketch how color gradates and alternates from warm to cool to warm to cool to warm to cool as it wraps around the form of the form.

Christine in Thoughtc
Christina in Thought sketch demonstrating three gradations of warm to cool

Still another way to think of using gradation with color, is by varying the amount of color intensity from very neutral to extremely chromatic. Notice here, from left to right, we experience neutral, chroma, less chroma, neutral. See how the most intense chroma is where I want you to linger the longest when you look at the painting. I use this same type of gradation many times in the landscape to move the viewer’s eye around the painting, lend atmospheric perspective, and add interest.
Satsuma Oranges
Satsuma Oranges uses the most intense chroma in the reflected light at the bottom of the second orange, and gradates slowly more neutral both left and right from there.

SHAPE, LINE, EDGE, and TEXTURE
Now, let’s take a look at gradation and how it can be useful in reference to other technical aspects of painting.
CastelSant'Angelo
Castel Sant’Angelo is an example of large and small shapes, strokes, line, and edge variation
When it comes to shapes, gradation suggests a hierarchy of importance in the different areas of the piece. Some areas of this piece are still very simple, large masses; similar in color and/or value, allowing the viewer’s eye to have “rest.” Other areas have been broken down into smaller and smaller shapes which draw you in and make you want to explore each shape’s meaning. Rather than describing, or detailing, every aspect of the painting in the same manner, leaving some areas quiet, others more exciting, and still others greatly defined can add interest to your work.
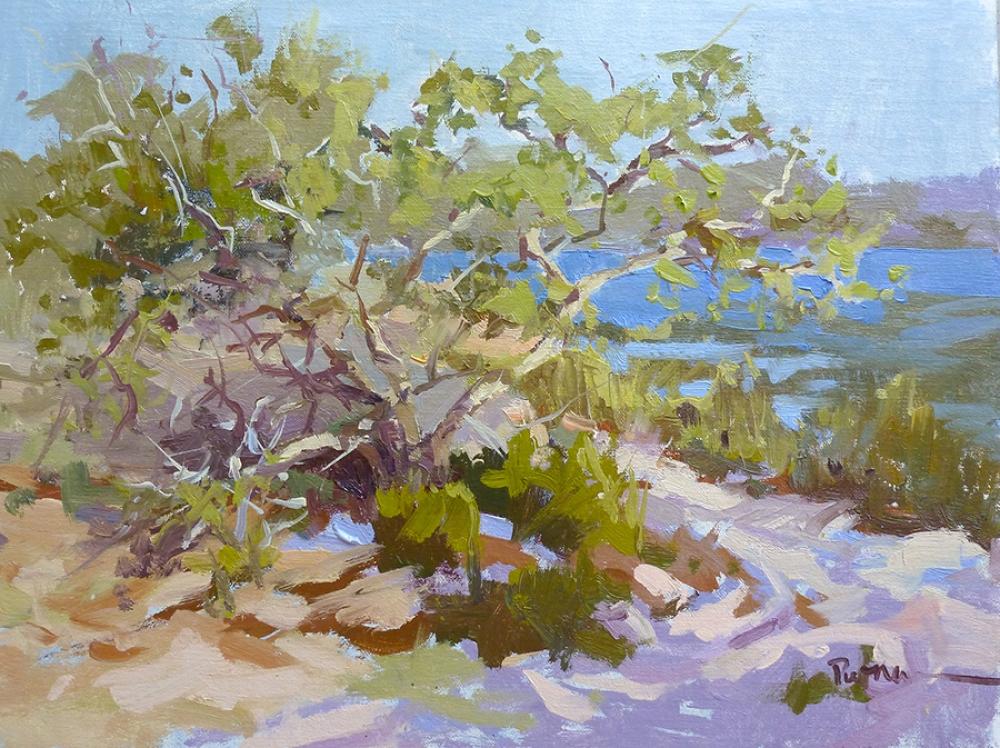
In this same painting, notice how the edges are gradated. See how they are much sharper and harder in the most important parts of the painting, and gradually become lost and soft as they radiate away from them.
Down to the Sea
Down to the Sea, implores gradation of color, neutral, value, edges, line, shape, texture, and thickness of paint.
A pleasing aesthetic and one which I use often, is the use of paint-thickness gradation. This painting shows us how some areas of paint are applied as thin washes. Still others seem to have one or two additional “coats” of paint. As the painting is completed, paint gradually gets thicker and thicker until final areas are closer to impasto. By using this type of gradation, we can gain texture and depth in a piece. The same is true here using gradation of line. Notice there are wide legato-like strokes as well as staccato-like, tiny accents. These two devices alone can increase impact in your work.

Practice seeing and using gradation as many ways as you can. Then edit and use the types that work best for your subject. This sort of experimentation brings a load of learning at the easel and buzz and excitement to your next exhibition.

Taking Flight: Tips for the Winged-Artist

Lori Putnam · Jun 3, 2013 · 5 Comments

Putnam -PanelPaks Canvas
PanelPaks, labeled with size. The small stack goes in my carry-on.
“How do you pack when you are taking a trip to Europe?” I get asked that a lot. My first thought is always, “The same way I pack for (readers, insert your favorite U.S. painting destination here.) I’m not sure what it is about going over a big body of water that seems so daunting. Maybe it is scary because you are worried you will over pack and have to lug your stuff through train stations, bus stations, and airports with which you are unfamiliar. The solution?

Tip of the day

Always pack like you are flying to Europe, even when you are traveling by car. You will get better at packing light and will appreciate it even when you are driving to your local beach or mountain range.
 

Essential Tips For Traveling with Oil Paint

Here are a few more tips for the winged-artist, no matter where you are going:
Pack less than you need
You already know this one and still, you don’t listen to yourself do you? Pack no more than 2 bags: One bag will hold most of your clothing and a small bag of paint. The other bag will hold most of your paint gear and a second small bag of paint. You may also pack an optional carry-on, just remember that now you have to be able to maneuver with 3 items. It helps if your carry-on tethers to your luggage easily or is a back-pack style.
Invest in a luggage scale
For $15 you can purchase small luggage scale which could save you hundreds of hours of worry or hundreds of dollars. Remember to PACK the luggage scale. You will need it when you return to weigh all of those wonderful souvenirs you bought.
Use your paint back pack as your carry-on
In addition to your make-up and jewels, items to be included in your carry on luggage (should you opt to have that added piece) are things that would very difficult or expensive to replace such as your easel (needs to be a compact style for this. I will be posting soon on my latest equipment find!); your brush roll with brushes (be sure to remove palette knives); and 1 or 2 PanelPaks with clean panels (just enough to hold you over until they locate your checked luggage if it is stuck somewhere in transit). Also pack business cards, event and travel contacts, schedule, maps, tickets, and other information in your carry on luggage for easy retrieval upon arrival.
Pack your voltage converter
Pack your voltage converter for whatever country you are visiting, camera, charger, memory cards, and other expensive electronics like computers and iPads in your carry-on (or do without them for a week… even better!)
Do not expand your luggage
Whether or not you are the typical souvenir-buying-tourist, likely you have experienced that things just don’t fit right when you pack to come home. You always wish you had a little more room for some reason. If you flew to your destination without expanding the extra expando-zipper on your suitcase, you will be able to do that now and have plenty of room for your stuff to fit. Just don’t forget to weigh it!
 

Details on traveling with oil paint and art supplies

In your checked luggage you will obviously need clothing (my list is shown below) and your REMAINING PAINT GEAR. Here are specifics on how to prepare supplies and make sure your oil paints and gear are packed carefully.
Paint
Putnam - Paint Tubes Wrapped BaggiesCarefully wrap each tube of paint with bubble wrap and label the outside with the color name. Tubes often punch holes in other tubes if you do not do this. What mess when you squeeze really hard and all the paint comes out of a tiny hole into the palm of your hand.
The length of travel determines how many tubes of paint I will need. For a week-long trip, I will pack 1-large tube of each color PLUS an additional tube of white AND 2-small tubes of each color. Then I place the tubes in thick zip-lock bags; the large tubes in one and the additional large white and small tubes in the other.
Next, I place a sheet of paper in each of the zip-lock bags that reads:

ARTISTS’ PIGMENT ENCLOSED.
The US Department of Transportation defines “flammable liquids” as those with a flash point 140 degrees F or below. Artist grade oil colors are based on vegetable oil with a flash point at or above 450 degrees F. THEY ARE NOT HAZARDOUS.
If you need to confirm this, please contact TSA at 866-289-9673 or their Hazardous Materials Research Center at 800-467-4922.
 
To contact this traveler, dial (ADD YOUR PHONE NUMBER HERE).

I used to always include the MSDS (Manufacturer’s Safety Data Sheets) with the tubes, but have not done that in a long time. These can usually be found on the manufacturer’s web site or on artist supply web sites.
Flying with Oil Putnam Bag ZippedI put one bag of paint in EACH pieces of checked luggage. This is a safe-guard just in case one gets lost or confiscated, I will at least have enough to get me by a few days until I can purchase more. By the way, knock on wood, I have NEVER had a single tube of paint be taken from me.
If asked, never refer to your paints as paints. Refer to them as “artists’ pigments”.
Panels
4 or 5 for each day x 7 days = 28 to 30 panels. Put half of your panels in one bag and the other half in the other.
Wet Panel Carriers
I suggest bringing wet panel carriers for carrying wet paintings. I have 2 PanelPaks in each of the sizes I like to paint. These are thin and lightweight. Each PanelPak will accommodate 2, wet canvases that are the same size. Be sure to throw in some extra bands in case you lose or break one. When assembling PanelPaks with new, clean, panels, place the canvas side out. This will help you easily identify which ones have useable panels in them and which ones already have beautiful works of art safely tucked toward the inside.
Other Gear

  • Back-pack (can double as your carry-on luggage, or used to provide extra padding in the top of your suitcase)
  • Plein air umbrella
  • Rain poncho or jacket
  • Flashlight and clip-on book lights (for painting nocturnes)
  • Utility tool and cork screw (seriously, cork screw is on my list)
  • Painting hat
  • Palette knives (remember NOT to have these in your carry on luggage)
  • Sketchpad and pencils
  • Empty, seal-able, OMS container* and small zip-lock bag
  • Small roll of wide, transparent tape
  • Mediums which are allowed by law (see manufacturer’s specifications)*

Putnam - Travel with Paint Carrying bagCollapsible cooler (makes great padding for potentially breakable toiletries. Use frozen bottles of water and have cold drinks and snacks all day.
*DO NOT take mineral spirits on flights. You can get them at your destination. Your first stop, after your glass of (readers, insert favorite beverage name here), should be (in order of preference) a local art store, hobby shop, or home restoration store to purchase Odorless Mineral Spirits, White Spirits, or Turpentine and other mediums. In a pinch, use the local olive oil instead of OMS. Just don’t confuse which bottle is for your back pack and which is for your dinner!
When you get to your destination, buy paper towels, baby wipes, sunscreen, bug spray, snacks, and water and save your grocery sacks for trash.
Frames
If it is a plein air festival, you will also be required to frame your work. Here are two possible options:

  1. Pack a small box of framing gear which includes hanging wire, strap hangers and screws, point driver, wire cutters, and screw driver. Have frames drop shipped to the location from your supplier.
  2. Pre-wire frames for horizontal hanging (you can always change them if you paint vertically). Ship frames, point driver, wire cutters, and screw driver to your location.

Whatever method you choose, pack extra promotional materials (business cards, workshop brochures, copies of your bio, etc.) to have on hand or affix to the back of your painting.
If I am teaching a workshop, I add ‘Workshop Booklets, 1 per student,’ to this list.
Suggested Clothing
Pack 3-days’ change of clothing and washing powder. Here is a copy of my personal packing list:

  • Painting clothes (shorts, jeans, tees, layers) for 3 days. Check the weather reports for the region and pack accordingly. No matter what picture you have of a place in your mind, there is no reason to show up in Carmel in a bikini if it is only going to be 62º for the high.
  • Under-garments (Okay… so my list actually says bras and panties… substitute boxers or briefs if appropriate.)
  • Barrettes and hair ties (obviously, optional)
  • Belt
  • Hiking shoes, tennis shoes, or boots (as geography demands) and socks; sandals if appropriate
  • Sleepwear
  • Dress clothes, jewelry, and nice shoes if needed (for opening receptions, networking dinners)
  • Prescriptions and over-the-counter remedies such as Advil
  • Lotion, make-up, deodorant, toothbrush and toothpaste, razor, hair products, and soap (assuming you are not staying in a luxury spa hotel that supplies these for you).
  • Laundry detergent (dry or dissoluble sheet type) and Murphy’s Oil Soap (for removing oil paint from clothing).

"Where The Wild Things Are" by Lori Putnam - 12" x 16"
“Where The Wild Things Are” by Lori Putnam – 12″ x 16″
Once I arrive at my destination, I squeeze paint on my palette and pack my back. I’m ready to paint at a moment’s notice.
You will probably question a few of the items I use (like the transparent tape and small zip-lock listed). Visit my blog at www.loriputnampaints.blogspot.com for information on that.
I’m certain there are lots of other great ideas out there. This is just what works for me. It’s become routine now. Hopefully it will help you too.
 

  • « Go to Previous Page
  • Page 1
  • Page 2
  • Page 3

Footer

  • Join OPA
  • Contact
  • Donate

© 2026 OPA - Oil Painters of America · Design by Steck Insights Web Design Logo