Highlight and center light
First it is important to understand what highlights are—and what they’re not.
Highlights are specular reflections of the light source on shiny surfaces. In specular reflection, light rays bounce off the surface at the same relative angle that they approach it, like a billiard ball bouncing off a side cushion. In diffuse reflection, light rays bounce away in all directions. Diffuse reflection is typical of a matte surface, such as an egg.
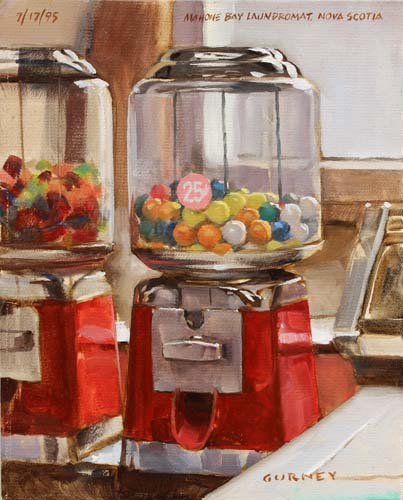
I painted this gumball machine while sitting in a coin laundry. There was a little highlight in the center of each ball, a reflection of the fluorescent lights above me. The highlights are even stronger in the chrome trim.
Where do highlights appear?
Unless the sun is coming from directly from behind you, the highlight appears in a different location than the center light. The highlight generally appears at a point closer to your eye than the center light. Unlike the center light, the position of the highlight depends on your point of view. The same highlight often appears differently to your right eye compared to your left eye.
Imagine placing a pocket mirror beside the object and angling the mirror so that it reflects the light source back into your eye. If the surface is shiny enough, any plane on the form parallel to the plane of the mirror will reflect a highlight back to you.
The effect of the surface
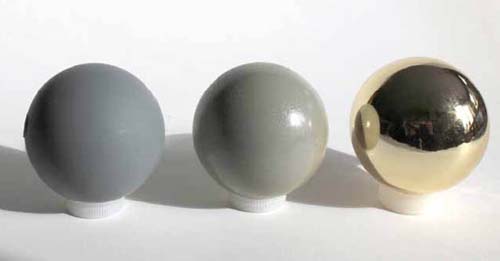
The shinier, oilier, or wetter the surface, the brighter the highlight. That’s why eyes, lips, and the tips of noses have brighter highlights than cheeks do. A matte surface with only diffuse reflection, such as a sweater or a sand dune, will not have any highlights at all.
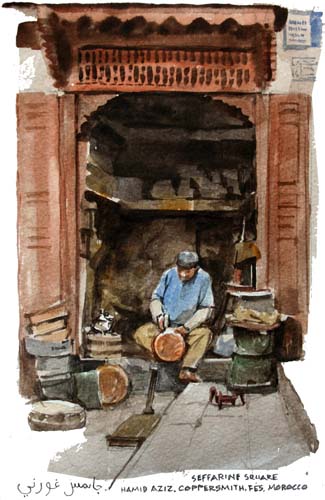
Painted on location in Fes, Morocco, the highlights in this coppersmith’s stall are brightest on the polished copper and silver. I had to run washes over all the areas but these two or three spots of pure white paper to carry the effect.
In other words, imagine how you would paint a regular matte-surfaced apple. If the same apple were given a high-gloss wax coating and you painted it again, you’d have to consider the normal modeling factors plus the specular effects
The effect of the light source
Highlights are also greatly influenced by the character of the light source. On a highly reflective silver surface, such as a spoon or a silver teapot, the highlight color will mirror the light source. A soft, cool light source such as a large window, will yield a large, cool highlight, while a hard, small, warm source such as the sun will result in a sharp, small, warm highlight. A highlight is typically the lightest value in the entire painting, nearly as light as the light source itself, and lighter than the center light.
Let’s look at the idealized example of a sculpted head covered with reflective silver paint. A green light shines from the left, a magenta light shines from the right front, and a blue light comes in from farther to the right. Even with three different light sources, the lights don’t really mix very much on the planes of the head. Instead, each light source accounts for a separate array of specular highlights, and each set of highlights defines a set of parallel planes. Our brains are able to construct an understanding of form based on these fragmentary bits of information.
Four rules of specular surfaces
1. The more reflective the surface, the brighter the highlights and the broader the range of values you need to paint it.
2. The size of the highlight is influenced by the curvature of the surface of the form. The more highly curved the surface, the smaller the highlight; the flatter the surface, the larger the highlight.
3. Whether you’re rendering digitally or traditionally, the specular pattern is a separate layer added on top of the usual modeling factors that you use to render the object.
4. The highlights on any glossy form are not pure white, but rather a combination of the color of the source and the local color of the object.
Annular Highlights
Highlights don’t form only on solid objects. They also can form into a pattern of circles made up of individual scratches on metal or twigs in trees. For example, when you look into the maze of ice-covered bare branches of a forest in winter, you’re only seeing a fraction of the detail. The light illuminates only a few of these branches while most of them blend invisibly into the general gray.
Only the branches that are perpendicular to the direction of the light catch the highlight. The illuminated twigs align into concentric rings around the center point of the light source. These annular highlights help the viewer to subconsciously orient to the location of the light source. The three arrows in the photo are placed perpendicular to the illuminated twigs. If you follow the arrows, they lead to the location of the sun.
You can also observe annular highlights in the scratches of a well-used stainless-steel surface, like the cookie sheet and pot lid, below, left. Look for them in the window of a passenger train on a late afternoon, in a spiderweb on a dewy morning, in a cornfield lit by a setting sun, or on tree branches surrounding a streetlight on a rainy night.
Tips for painting highlights
1. In watercolor, since highlights are the lightest values, they must be left as unpainted white paper, masked out from the start, or applied with gouache at the last.
2. In oil paintings, highlights should be saved for the last, like a garnish of chives or a dash of parmesan cheese on a finished entrée. People observing John Singer Sargent said he saved highlights for the final strokes, considered them carefully, and used thick, heavy impasto for the highlights on jewelry, fingernails or eyes.
3. Avoid a lavish use of highlights. Highlights are like salt. A little makes the food tasty, but too much ruins it.