• Skip to primary navigation
  • Skip to main content
  • Skip to footer
  • Help Desk
  • My Account

OPA - Oil Painters of America

Dedicated to the preservation of representational art

  • Home
  • About
    • Mission, Policies & Bylaws
    • Board of Directors
    • Presidential History
    • Frequently Asked Questions
    • History
    • OPA Staff
    • Contact Us
  • Membership Services
    • Member Login
    • Membership Information
    • State & Province Distribution For Regionals
    • Update Member Information
    • Membership Directory
    • Contact Membership Department
  • Events
    • Exhibitions
    • Online Showcase
    • Lunch and Learn
    • Virtual Museum Road Trip
    • Paint Outs
  • Resources
    • Brushstrokes Newsletters
    • Ship and Insure Info
    • Lunch & Learn Video Archives
    • Museum Road Trip Video Archives
  • Services
    • Sponsorship Opportunities
    • Scholarships
    • Critique Services
    • Workshops
    • Have A HeART Humanitarian Award
  • Online Store
  • Awardees
  • Blog
    • OPA Guest Bloggers
    • Blogger’s Agreement (PDF)
    • Comment Policy
    • Advertisement Opportunities
  • Show Search
Hide Search

Travel

Taking Flight: Tips for the Winged-Artist

Lori Putnam · Jun 3, 2013 · 5 Comments

Putnam -PanelPaks Canvas
PanelPaks, labeled with size. The small stack goes in my carry-on.
“How do you pack when you are taking a trip to Europe?” I get asked that a lot. My first thought is always, “The same way I pack for (readers, insert your favorite U.S. painting destination here.) I’m not sure what it is about going over a big body of water that seems so daunting. Maybe it is scary because you are worried you will over pack and have to lug your stuff through train stations, bus stations, and airports with which you are unfamiliar. The solution?

Tip of the day

Always pack like you are flying to Europe, even when you are traveling by car. You will get better at packing light and will appreciate it even when you are driving to your local beach or mountain range.
 

Essential Tips For Traveling with Oil Paint

Here are a few more tips for the winged-artist, no matter where you are going:
Pack less than you need
You already know this one and still, you don’t listen to yourself do you? Pack no more than 2 bags: One bag will hold most of your clothing and a small bag of paint. The other bag will hold most of your paint gear and a second small bag of paint. You may also pack an optional carry-on, just remember that now you have to be able to maneuver with 3 items. It helps if your carry-on tethers to your luggage easily or is a back-pack style.
Invest in a luggage scale
For $15 you can purchase small luggage scale which could save you hundreds of hours of worry or hundreds of dollars. Remember to PACK the luggage scale. You will need it when you return to weigh all of those wonderful souvenirs you bought.
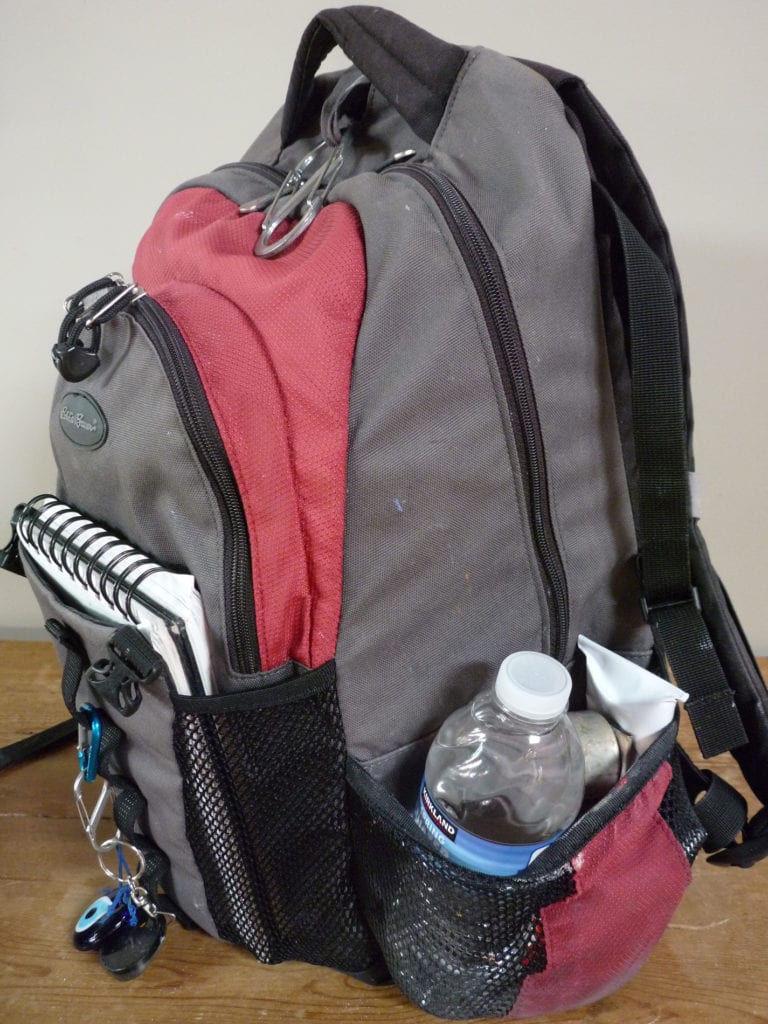
Use your paint back pack as your carry-on
In addition to your make-up and jewels, items to be included in your carry on luggage (should you opt to have that added piece) are things that would very difficult or expensive to replace such as your easel (needs to be a compact style for this. I will be posting soon on my latest equipment find!); your brush roll with brushes (be sure to remove palette knives); and 1 or 2 PanelPaks with clean panels (just enough to hold you over until they locate your checked luggage if it is stuck somewhere in transit). Also pack business cards, event and travel contacts, schedule, maps, tickets, and other information in your carry on luggage for easy retrieval upon arrival.
Pack your voltage converter
Pack your voltage converter for whatever country you are visiting, camera, charger, memory cards, and other expensive electronics like computers and iPads in your carry-on (or do without them for a week… even better!)
Do not expand your luggage
Whether or not you are the typical souvenir-buying-tourist, likely you have experienced that things just don’t fit right when you pack to come home. You always wish you had a little more room for some reason. If you flew to your destination without expanding the extra expando-zipper on your suitcase, you will be able to do that now and have plenty of room for your stuff to fit. Just don’t forget to weigh it!
 

Details on traveling with oil paint and art supplies

In your checked luggage you will obviously need clothing (my list is shown below) and your REMAINING PAINT GEAR. Here are specifics on how to prepare supplies and make sure your oil paints and gear are packed carefully.
Paint
Putnam - Paint Tubes Wrapped Baggies
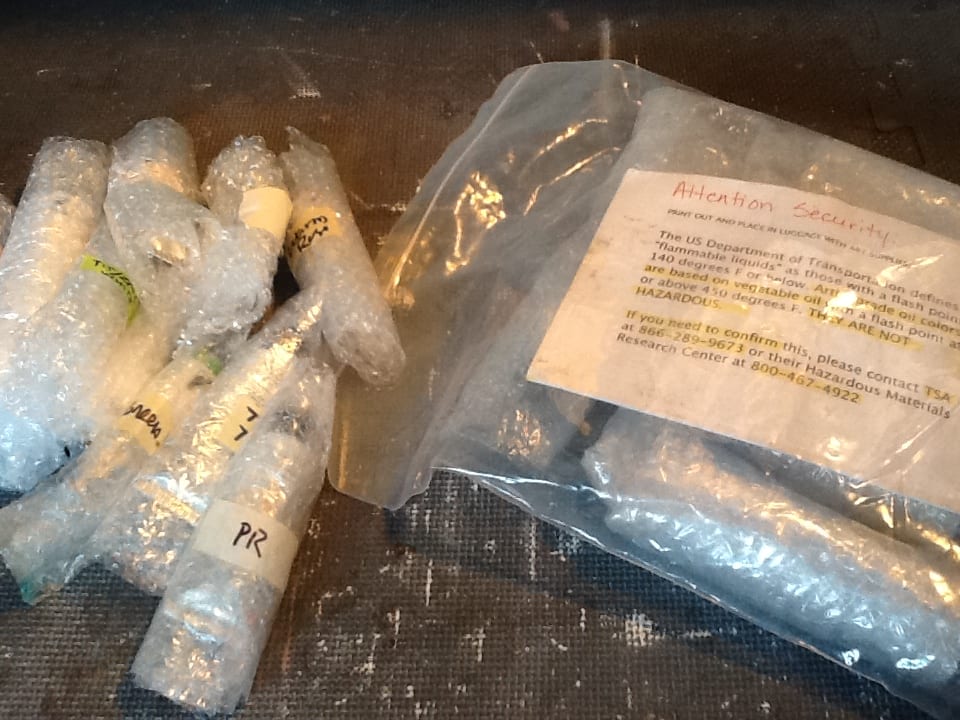
Carefully wrap each tube of paint with bubble wrap and label the outside with the color name. Tubes often punch holes in other tubes if you do not do this. What mess when you squeeze really hard and all the paint comes out of a tiny hole into the palm of your hand.
The length of travel determines how many tubes of paint I will need. For a week-long trip, I will pack 1-large tube of each color PLUS an additional tube of white AND 2-small tubes of each color. Then I place the tubes in thick zip-lock bags; the large tubes in one and the additional large white and small tubes in the other.
Next, I place a sheet of paper in each of the zip-lock bags that reads:

ARTISTS’ PIGMENT ENCLOSED.
The US Department of Transportation defines “flammable liquids” as those with a flash point 140 degrees F or below. Artist grade oil colors are based on vegetable oil with a flash point at or above 450 degrees F. THEY ARE NOT HAZARDOUS.
If you need to confirm this, please contact TSA at 866-289-9673 or their Hazardous Materials Research Center at 800-467-4922.
 
To contact this traveler, dial (ADD YOUR PHONE NUMBER HERE).

I used to always include the MSDS (Manufacturer’s Safety Data Sheets) with the tubes, but have not done that in a long time. These can usually be found on the manufacturer’s web site or on artist supply web sites.
Flying with Oil Putnam Bag ZippedI put one bag of paint in EACH pieces of checked luggage. This is a safe-guard just in case one gets lost or confiscated, I will at least have enough to get me by a few days until I can purchase more. By the way, knock on wood, I have NEVER had a single tube of paint be taken from me.
If asked, never refer to your paints as paints. Refer to them as “artists’ pigments”.
Panels
4 or 5 for each day x 7 days = 28 to 30 panels. Put half of your panels in one bag and the other half in the other.
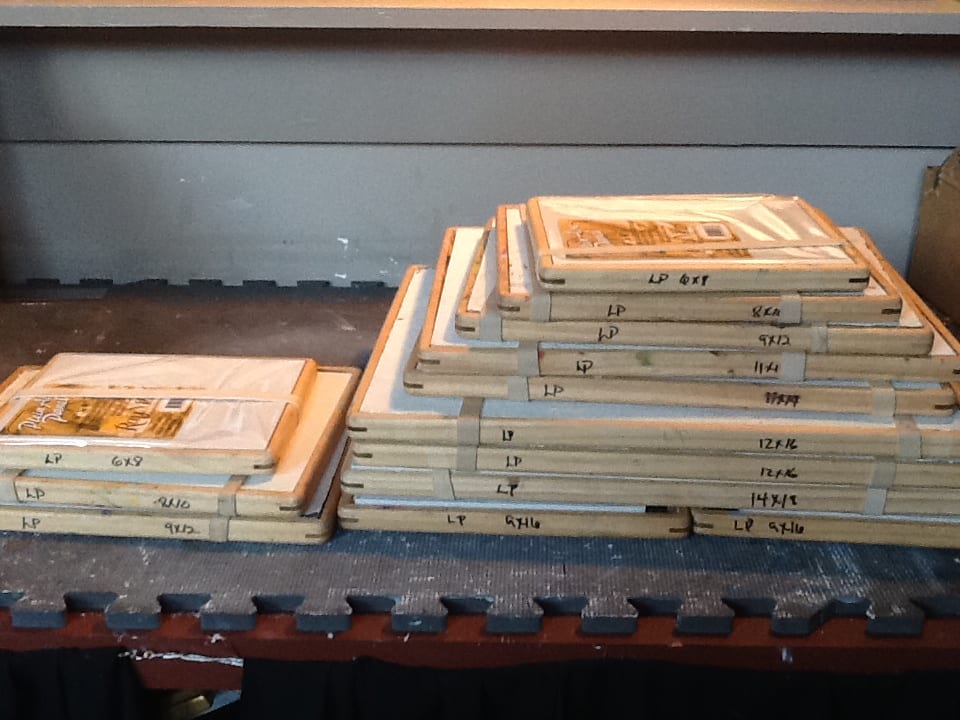
Wet Panel Carriers
I suggest bringing wet panel carriers for carrying wet paintings. I have 2 PanelPaks in each of the sizes I like to paint. These are thin and lightweight. Each PanelPak will accommodate 2, wet canvases that are the same size. Be sure to throw in some extra bands in case you lose or break one. When assembling PanelPaks with new, clean, panels, place the canvas side out. This will help you easily identify which ones have useable panels in them and which ones already have beautiful works of art safely tucked toward the inside.
Other Gear

  • Back-pack (can double as your carry-on luggage, or used to provide extra padding in the top of your suitcase)
  • Plein air umbrella
  • Rain poncho or jacket
  • Flashlight and clip-on book lights (for painting nocturnes)
  • Utility tool and cork screw (seriously, cork screw is on my list)
  • Painting hat
  • Palette knives (remember NOT to have these in your carry on luggage)
  • Sketchpad and pencils
  • Empty, seal-able, OMS container* and small zip-lock bag
  • Small roll of wide, transparent tape
  • Mediums which are allowed by law (see manufacturer’s specifications)*

Putnam - Travel with Paint Carrying bag
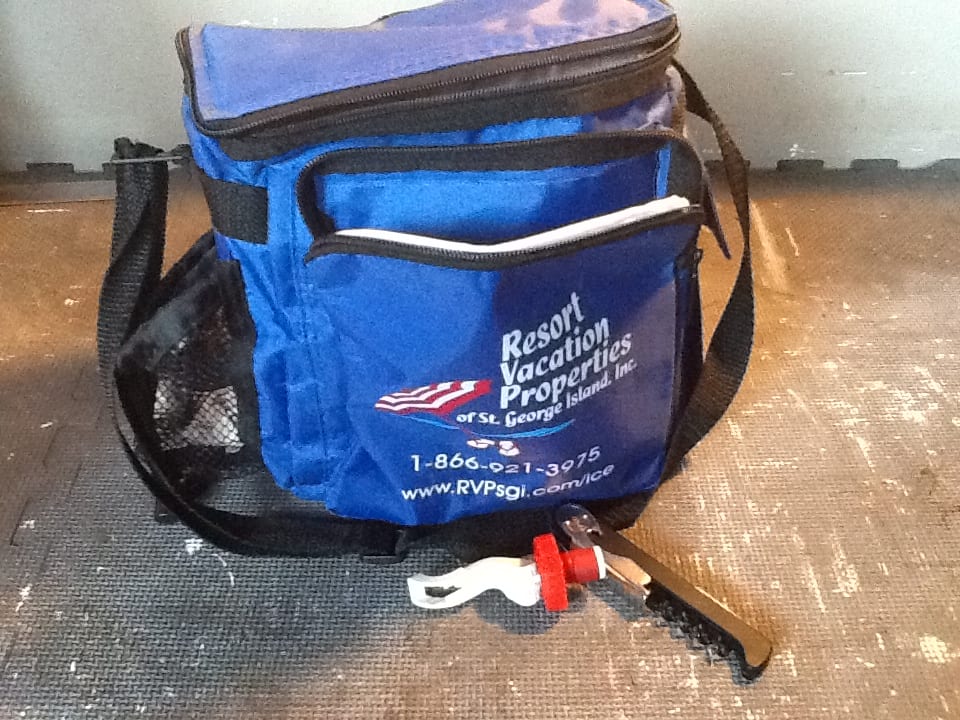
Collapsible cooler (makes great padding for potentially breakable toiletries. Use frozen bottles of water and have cold drinks and snacks all day.
*DO NOT take mineral spirits on flights. You can get them at your destination. Your first stop, after your glass of (readers, insert favorite beverage name here), should be (in order of preference) a local art store, hobby shop, or home restoration store to purchase Odorless Mineral Spirits, White Spirits, or Turpentine and other mediums. In a pinch, use the local olive oil instead of OMS. Just don’t confuse which bottle is for your back pack and which is for your dinner!
When you get to your destination, buy paper towels, baby wipes, sunscreen, bug spray, snacks, and water and save your grocery sacks for trash.
Frames
If it is a plein air festival, you will also be required to frame your work. Here are two possible options:

  1. Pack a small box of framing gear which includes hanging wire, strap hangers and screws, point driver, wire cutters, and screw driver. Have frames drop shipped to the location from your supplier.
  2. Pre-wire frames for horizontal hanging (you can always change them if you paint vertically). Ship frames, point driver, wire cutters, and screw driver to your location.

Whatever method you choose, pack extra promotional materials (business cards, workshop brochures, copies of your bio, etc.) to have on hand or affix to the back of your painting.
If I am teaching a workshop, I add ‘Workshop Booklets, 1 per student,’ to this list.
Suggested Clothing
Pack 3-days’ change of clothing and washing powder. Here is a copy of my personal packing list:

  • Painting clothes (shorts, jeans, tees, layers) for 3 days. Check the weather reports for the region and pack accordingly. No matter what picture you have of a place in your mind, there is no reason to show up in Carmel in a bikini if it is only going to be 62º for the high.
  • Under-garments (Okay… so my list actually says bras and panties… substitute boxers or briefs if appropriate.)
  • Barrettes and hair ties (obviously, optional)
  • Belt
  • Hiking shoes, tennis shoes, or boots (as geography demands) and socks; sandals if appropriate
  • Sleepwear
  • Dress clothes, jewelry, and nice shoes if needed (for opening receptions, networking dinners)
  • Prescriptions and over-the-counter remedies such as Advil
  • Lotion, make-up, deodorant, toothbrush and toothpaste, razor, hair products, and soap (assuming you are not staying in a luxury spa hotel that supplies these for you).
  • Laundry detergent (dry or dissoluble sheet type) and Murphy’s Oil Soap (for removing oil paint from clothing).

"Where The Wild Things Are" by Lori Putnam - 12" x 16"
“Where The Wild Things Are” by Lori Putnam – 12″ x 16″
Once I arrive at my destination, I squeeze paint on my palette and pack my back. I’m ready to paint at a moment’s notice.
You will probably question a few of the items I use (like the transparent tape and small zip-lock listed). Visit my blog at www.loriputnampaints.blogspot.com for information on that.
I’m certain there are lots of other great ideas out there. This is just what works for me. It’s become routine now. Hopefully it will help you too.
 

The Traveling Artist

Ms. Michelle Alford · Mar 18, 2013 · 9 Comments

Shelli-Alford-Florida
Shelli Alford and Rob Liberace at his Sarasota, Florida workshop.

After my youngest went off to boarding school a little over a year ago, I decided to create a new job for myself. The very-tall-order job I created was to become a “Traveling Artist.” The job description: learn how to paint like a master from living masters and then to blog about the workshops and classes that I attend. My blog is called TheTravelingArtist.net.
Like many of you, I was very frustrated with the art education that I received in college. For a very long time, I thought I was the only person on the planet who wanted to know how the old masters created their works of art. It would be wonderful if there were a “master” ranking list of current artists who paint like the original old masters. But as I cannot find one, I created one for myself. I have never showed it to anyone, but every time I hear about an artist or I see someone’s work at The Art of the Portrait Conference that I love, I look them up and find out if they give classes or workshops. I assign a star rating from 1 to 5 (although I have yet to give an artist a 5) and then attend workshops or classes by artists whom I rank highly. The list is constantly changing and readjusting as I discover new artists.
It took me months to find a place where I could take classes from someone I respected. I joyfully found my first class with Alex Tyng at the Wayne Art Center in Wayne, PA. And so my self-directed art education began.
Shelli-Alford-Johan-Cedarlund-Jeremy-Lipking
Dr. Johan Cedarlund, director of the Zorn Museum in Mora, Sweden, me Shelli Alford and Jeremy Lipking

Since this first class, I have attended classes and workshops from Aaron Westerberg, Rob Liberace, Jeremy Lipking, Ellen Cooper, Casey Baugh, Garth Herrick, Sadie Valeri and David Kassan in many different cities and countries. I am in Utah right now attending a great one with Ryan Brown. There have been workshops that I have not enjoyed, but when that has happened, I have followed my parents’ rule: “If you have nothing nice to say, don’t say anything at all.” So, I just don’t blog about them.
As a result of my experiences taking workshops and blogging, I have developed a number of resources for potential workshop students, including upcoming workshops, price lists, tips for working with models, and much more. But before you dive headfirst into the wonderful world of workshops, here is a list of “unexpected things to expect” about workshops, plus my suggestions to artist teachers who want to provide the best possible experience for their attendees:
Unexpected things you should expect when attending oil painting workshops
Traveling to a new city (or country!) can be logistically difficult and will often be expensive. The upfront workshop fees do not always include all costs, such as model fees, travel expenses for day trips, extra supplies, etc. Transportation can definitely be a limiting factor as well… how do I get to said day trip? Be prepared to be flexible, or be proactive and call ahead of time for ALL the logistical/financial details.
Me Jeremy Lipking and some of the Swedish workshop attendees.
Me, Jeremy Lipking and some of the Swedish workshop attendees.

Free Tip for Workshop Hosts
Workshop instructors can help make these situations easier by handling the logistics of the workshop and presenting them upfront. Communicate every aspect of the workshop ahead of time so attendees know when and where they have to be and which supplies are required. Then, help coordinate how to get there. This is doubly true for workshops in other countries. Your attendees are there to learn art, not memorize the local public transportation system or pay for your personal vacation.
*Additionally, charging model fees is stingy and rude; just don’t do it.

If you are traveling to a workshop, odds are that you are going to have to spend the night somewhere. Workshops do sometimes provide accommodations, but they do not always accommodate you. For example, I was surprised at one workshop to find that in my room was… another person. I had not been told that I would be sharing a room, and I was not happy about it at first, but the problem ended up being a blessing because I met someone who became a terrific friend. Whether you are someone who needs their own space or is up for making new friends, be aware that you may have to speak up ahead of time to get what you want.

Free Tip for Workshop Hosts
An interesting way to approach the lodging logistics is to tell people upfront if you expect them to share a room before they sign up; then provide the option for them to pay extra for a single room. This way, if attendees feel very strongly about having their own space, it is an option, but it would cost more than doubling up. As in my case, I would never in a million years have agreed to a roommate given the straight option. On the other hand, I would have missed out on meeting a great friend.

Workshops don’t usually provide all the supplies you will need, and may not let you know what you need ahead of time. This means you might have to consider schlepping your easel with you, especially if it is a Plein Air workshop. Set up an arrangement ahead of time if your workshop does not already supply easels to take one on loan from the workshop. Also, if you happen to have paper towel preferences (my personal favorite is Viva), check for grocery or art stores near the workshop in advance. I know that sounds trivial, but think about the space packing paper towels takes up! Take advantage of those cool local art stores (like at the Scottsdale Artist School). You might find something you didn’t know you were missing.

Free Tip for Workshop Hosts
If you are putting on a workshop that requires specific supplies, you are doing yourself and your students a disservice if you do not a) let them know ahead of time, or b) offer for sale what they will need. This is a great way for workshops to make a little extra money. Easels and paper towels are two crucial things, but you will make everyone’s life easier if you have a little of everything beforehand in the package price or for sale at the workshop, as people really are bound to forget something.

Ryan Brown, Barack Alius and me, Shelli Alford

Workshop attendees gossip. We all do it. Here are the top 3 things we talk about:
Whether or not a teacher artist behaves appropriately and professionally around models and groupies. Okay. Workshop instructors, I am speaking directly to you. Want to get people who attend your classes talking about the right things? Be professional around your attendees, the models, and your “groupies” (yes, you know who they are).
How much personal attention an instructor gives each attendee. Even if an attendee is shy, no one wants to feel neglected. Your attendees are not cattle; they each have special needs. Keep workshops small, or come up with a system that allows you to interact one-on-one with each attendee. This will most likely mean tightrope walking between encouraging your attendees to ask questions and controlling that one attendee who is totally hogging your attention.
Money. If attendees are being charged for something, such as a model fee, that was not included in the original price, you can be sure they will have something to say about it. I really cannot overstate how rude that gesture is. Every attendee should be told upfront what costs are involved; this is a necessity. These starving artists are already paying a lot to be at the workshop, so the least you can do is be forthright about what they are getting into.

Closing Thoughts

For more pointers and opinions, head over to my blog. But I will end on a positive note, leaving you with three really cool ideas that were highlights of workshops for me:
A wonderful idea from the Townsend Atelier was how to handle jockeying for a good easel position. There were a lot of attendees and all of the easels were already set up with a number attached to them. Each attendee drew a number from a bowl and, via lottery system rules, had to go with whatever easel they drew.

Another great idea, from Charlie Miano of The Southern Atelier, was when he had his Italian father come up to the workshop one day and bring us a delicious Italian wedding soup as a kind of send-off lunch. It felt so nice to be appreciated and was a great way for the attendees to unwind at the end of the workshop.

Finally, at the Jeremy Licking workshop, we were given the email addresses of the fellow attendees. This provided a great forum for gossiping communication.
I hope this help you as you embark on your own wonderful adventure of workshop touring. I love it! The teaching is so concentrated I feel I make much more progress at a workshop than I do in a lengthy class.
Have questions or suggestions of a great master artist? Submit your comment below.

Art in Cuba and the Traveling Painter

Ms. Jane Barton · Jul 30, 2012 · 3 Comments

Jane Barton in Italy
There are no starving artists in Cuba. One reason for this is that each person receives food from the government each month: one quarter of a chicken, 5 eggs and 5 pounds each of rice, black beans and sugar. (Sugar is cheap in Cuba and heath care is free to the rising numbers of diabetics.)
Artists there make more money than doctors, lawyers or university professors. Why? Because they are not, like the others, state employees, and are able to keep more of what they make. Again, why? Because Castro considers them cultural ambassadors and curators, and very important to keeping the Cubans….Cuban.
Would it be worth it to live in Cuba, with the restrictions that entails, to be at the top of the food chain for a change? Not for me. But I can tell you that in many ways the young, hip, vibrant artists that I recently met on my trip to Havana were no different from artists here in the U.S. They were enthusiastic about their current work at the Biennial, complained about the price of art supplies which had to be imported from Europe and knew how to party. The Art gene is a powerful one.
I’ve just started paintings from that wonderful trip. The Cubanos are a beautiful, friendly group. The city of Havana reminds me of a stunning woman “of a certain age” whose beauty is still there under the surface of time’s wear, and I don’t know what they do to the black beans and rice (known as “Moors and Christians”) but my mouth waters just thinking about them. The Buena Vista Social Club music is in the air and makes you want to get up and dance in between endless rounds of mojitos and pina coladas.
"Pit Stop" by Jane Barton
“Pit Stop” by Jane Barton
Oh, and then there are the cars–I took 360 photos of mid-century Chevys, Buicks and even one of the few 1956 Lincoln Continental Mark Twos in the western hemisphere. My first painting, shown here, is a common scene in Havana: a car is stopped dead on a city street and Cubanos are all over it, once more figuring out how to make it run again with no parts and no gas. That’s what I really loved about the people–they may be captive on their little island, but they sure know how to, in the words of Tim Gunn, “make it work.”

Traveling Tips for Oil Painters

I wasn’t able to paint on this trip, but I’m often asked about the nuts and bolts of managing it all. Travel with art supplies takes some careful preparation. Finding art stores can be challenging, if not impossible, in some countries. Besides that, we all have our favorite colors and canvas surfaces and painting in a foreign country can be intimidating enough without trying to make do with unfamiliar supplies.
Since 9/11 the rules regarding combustibles are strict. I often avoid the problem by taking watercolors, but even then those little tubes often look suspicious to a TSA agent. I’ve had no trouble (so far) packing oil paints in my luggage and I thought I’d share what I do, with the understanding that we can but try…

  1. Before you leave, try to determine how many canvases you’ll be able to complete each day: one in the morning, one in the afternoon, one for good luck? How much paint will you need? If you don’t know how much paint you use in a week or two, start keeping track of what you use before you leave. You’ll probably need a lot of white paint and small (37ml) tubes of colors you use regularly, but just half a tube of specialty colors, like reds for flowers. Paint tubes are heavy, so find out the weight limit for your airline and pack carefully to avoid extra baggage charges.
  2. I make sure that I include a very visible note (see below) to the TSA on the outside of a double zip lock bag of paints. The note assures the TSA people that the contents are not combustible. I learned on the Gamsol site and others NEVER to refer to the contents as “paint”! The double bag is because the paints might pop open due to baggage hold pressure and you probably don’t want to wear dioxizine purple all over your clothes…for a week.
    ATTN: TSA
    THESE ARTIST COLORS ARE MADE FROM VEGETABLE OIL AND
    CONTAIN NO SOLVENT.
    ARTIST GRADE COLORS ARE VEGETABLE BASED WITH A FLASH POINT ABOVE 550.
    THEY ARE NOT HAZARDOUS.
  3. "The Boys from Peru" by Jane Barton
    “The Boys from Peru” by Jane Barton

  4. The next question is how to transport those precious wet canvases home. Once you know how many canvases you think you’ll need, there are several ways to carry and pack them efficiently. On my first trip to France I precut my 8 x 10” canvas with a 1/2 inch border around them. I carried three or four 1/8 inch gator boards that were another half inch larger than the canvas. (Wildlife painter Carl Rungius just thumbtacked the corners, so you can try that.) At the end of a painting session I pulled the wet canvas off the board, set it aside to dry, and taped a fresh one on for the next day. You can bring dozens of canvases this way with a minimum of weight and space. By the end of the trip–a week or two–the first canvases are pretty dry and can safely be stacked with sheets of waxed paper between them. The wet ones can be mounted on both sides of the boards and taped together with push pin “spacers”, then wrapped tightly in plastic for the trip home. You can also use a light weight card board wet box to transport them home. On my last trip to Italy, I brought Raymar’s Featherweight boards and loved them. Whatever method you decide to use, it helps to bring just one size board so they’ll stack and pack easily. You can always adjust the size with tape if you decide you need a different shape for a particular subject.
  5. Be sure to carry on the things you can’t live without. I carry a 2 to 3 oz. plastic bottle of Liquin in my carry on “liquids” bag and add a little of it each day to my white paint. That ensures that most of the colors will have some drying agent in them to help speed up the process. I carry on my brushes. We all have our favorites and are unlikely to find them in little out of the way towns). I also include a few canvases, boards and masking tape. These are the things that are hard to replace if my bag gets lost for a few days.
  6. Needless to say, you cannot pack or carry on Gamsol or turps–the first adventure in each town is finding some at a hardware store or art store if they have one! It helps if you can look up the words for “turpentine”, “mineral spirits”, “solvent” and “odorless” and write them down before you leave the country.
  7. I also make sure that my brush washer container is as odor free as I can make it–I wash it out in soapy water and double zip lock bag it to avoid having any problem there. I pack my palette knife in my luggage, too, and pray for it’s safe arrival.
  8. "Working On The Nets" by Jane Barton, 12x9, Oil on board, 2011
    “Working On The Nets” by Jane Barton
  9. Finally, my “insurance kit”: I always carry on a very compact kit of watercolor paper, paints squeezed out in palette cups and left out to dry before I pack them, brushes and old film containers for water–if the oils don’t make it for a while, I still can hit the ground running and start painting when I arrive in town.
  10. There are no guarantees and the rules change, so be sure to check airline websites before you leave, but these ideas have worked for me and I’ve had so many wonderful experiences painting abroad! I hope you’ll share any travel tips you’ve discovered in your travels with us on this blog. Happy painting–wherever you may be!

    “A journey is a person in itself; no two are alike. and all plans, safeguards, policies and coercion are fruitless, we find after years of struggle that we do not take a trip; a trip takes us.”
    -John Steinbeck

Footer

  • Home
  • About
    • Mission, Policies & Bylaws
    • Board of Directors
    • Presidential History
    • Frequently Asked Questions
    • History
    • OPA Staff
    • Contact Us
  • Membership Services
    • Member Login
    • Membership Information
    • State & Province Distribution For Regionals
    • Update Member Information
    • Membership Directory
    • Contact Membership Department
  • Events
    • Exhibitions
    • Online Showcase
    • Lunch and Learn
    • Virtual Museum Road Trip
    • Paint Outs
  • Resources
    • Brushstrokes Newsletters
    • Ship and Insure Info
    • Lunch & Learn Video Archives
    • Museum Road Trip Video Archives
  • Services
    • Sponsorship Opportunities
    • Scholarships
    • Critique Services
    • Workshops
    • Have A HeART Humanitarian Award
  • Online Store
  • Awardees
  • Blog
    • OPA Guest Bloggers
    • Blogger’s Agreement (PDF)
    • Comment Policy
    • Advertisement Opportunities

© 2025 OPA - Oil Painters of America · Design by Steck Insights Web Design Logo