I’ll admit I’m quite a tinkerer when it comes to new gizmos to enhance my studio or painting experience. Over the years, innovative solutions have included making custom-sized palettes out of Corian in a perfect neutral gray color called Concrete, and using a mobile laptop desk or a French caterer’s cart discovered in a vintage furniture store as a tabouret.
Long ago I decided my painting style required a very smooth and stable surface to allow me to achieve the level of detail that I enjoy painting. Nothing says “luxe” to me more than a yummy fine weave of Belgian linen glued onto a fine birch panel, available from several fine art panel suppliers. I use these primarily for important commission pieces.
Yet there are some wonderful new materials that can outperform even linen or wood. For example, fine weaves of polyester art canvas are less prone to sagging than linen, and aluminum composite panels (made out of ACM) are more stable than wood panels (which can expand or contract). ACM is sold under brand names like Dibond, and sometimes you can find budget-friendly remnant pieces from sign makers.
Since I cannot control climate variations like temperature and humidity once a painting leaves my studio, I need to ensure my paintings are well constructed to avoid future problems.
By properly gluing fabric on panels instead of stretching it, the fabric becomes just a texture on which to paint. It no longer supports the paint layer because the panel does that. (Of course, the fabric still needs to be isolated from oil paint with a good sizing, just like linen.)
Here is when my “tinkerer’s brain” kicked in, once again.
Silk is a very strong, luxurious and durable fabric—think parachutes and the ancient art of Bo painting in China. It also has a very fine texture, perfect for achieving fine details while retaining the texture of a fine fabric surface. I liked the idea of using silk on my painting panels, but found some silks were better suited to my purpose than others.
Silk quality is measured in a numerical momme weight, which describes the weight of 100 yards of silk, 45 inches wide, in pounds. So 100 yards of 45” wide silk that weighs 23 pounds is referred to as “23mm”. Higher quality silks are 14mm or higher.
I began experimenting with different grades and weaves of silk and all were strong and adhered beautifully. You can buy small samples to test and see what weave suits your needs. I found it was easier to apply a heavier weave than an extremely sheer weave, so I settled on a natural unbleached 23mm spun silk broadcloth. I purchased it from a wholesale supplier in remnant pieces, some as large as 8 yards long, at a great discount making it a budget-friendly material, indeed!
Since silk is more sheer than even the finest linen, I needed to eliminate “bubbles” as the fabric was applied. I discovered a key step in that process: making sure the silk was uniformly damp before applying and stretching it over the glue-covered panel.
The dampness didn’t affect the adhesion, since I used an acrylic dispersion for the glue. In fact, it ensured the glue soaked into and around the fabric, giving me a much more uniform coating than if there were “dry” spots on the surface. The resulting panels have provided a lovely painting surface for my painting style. I hope this inspires you to give it a try!
A Process for Prepping an ACM Painting Panel using Silk
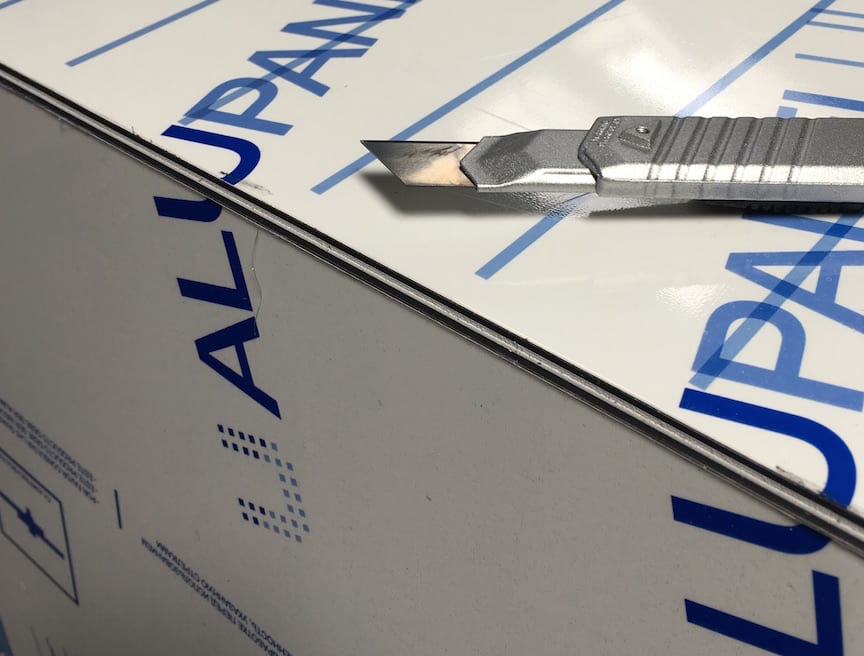
- Measure and cut a piece of ACM (.012”/3mm thickness) using a straight edge and utility knife. You can score the material through halfway and bend it over a table edge to finish the cut.
- Remove the plastic protective film and sand it lightly with 150 grit sandpaper and etch with isopropyl alcohol to remove the finish coating and create some “tooth” for the glue to adhere. (Do NOT sand down to the aluminum!).
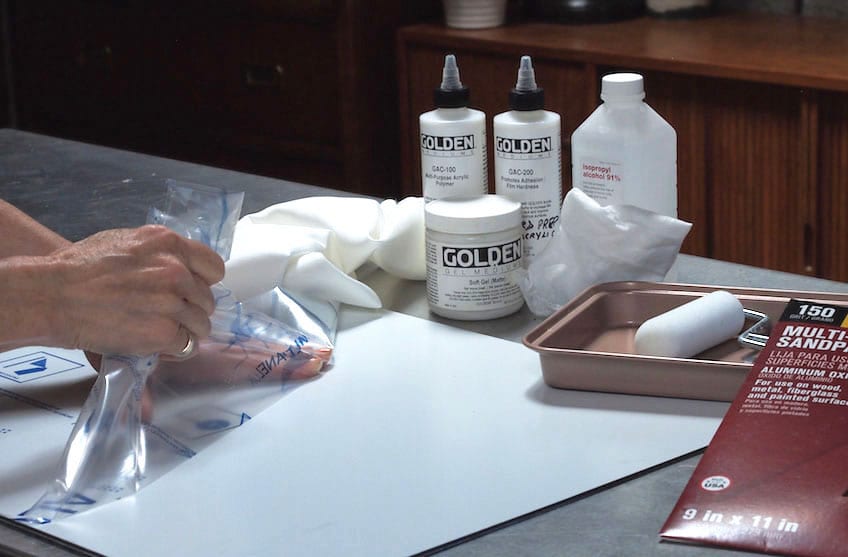
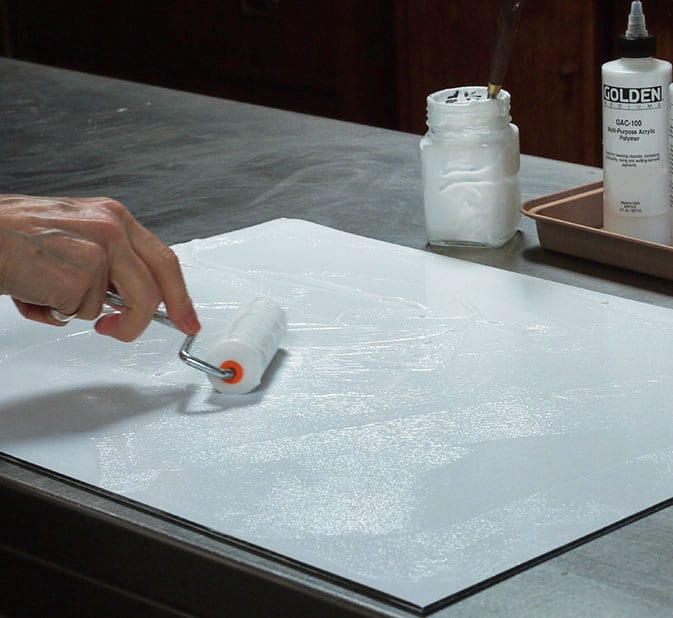
- Cut a piece of silk to overhang the board by about an inch or two. Immerse the silk in a bowl of distilled water, then press between two towels until it is just damp. Using a foam roller, roll a thick layer of Golden GAC200 mixed 50/50 with Acrylic gel medium over the board, making sure to cover evenly and out to all the edges.
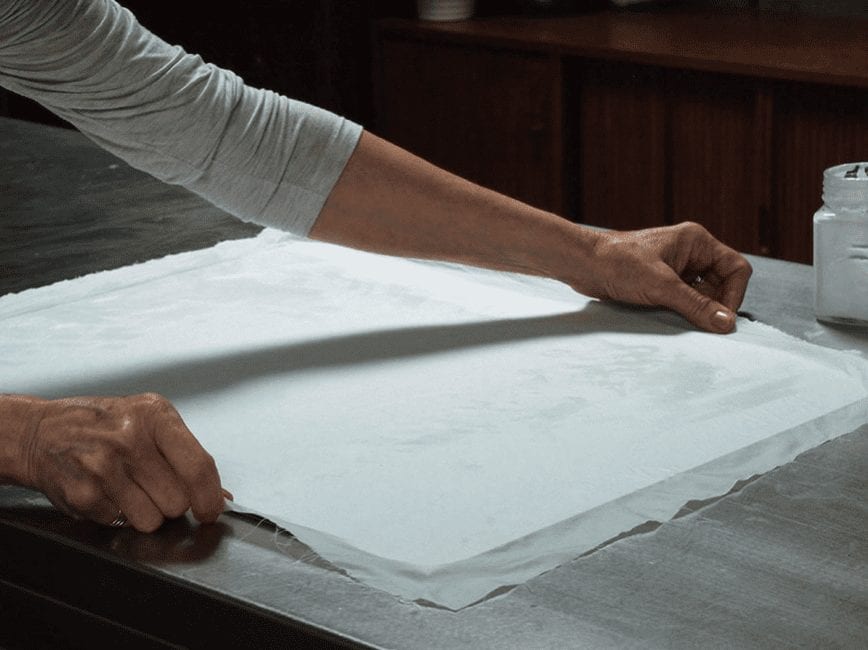
- Taking the silk, quickly “flap it” and lay it over the board as if you are putting a sheet on a bed. Now working from side to side, stretch and pull the damp fabric to eliminate bubbles and make sure the weave aligns with the edges of the panel. Tugging from the outside edges, pull it out until you have a completely smooth surface. Using a brayer or or an old credit card, smooth the silk out from the center to all edges. If you get a bubble, you can lift the fabric and tug that section, as the dampness keeps the acrylic dispersion from drying too quickly. Apply extra medium to any edges or corners that need it. You can also roll out or brush on a thin layer of the gel medium mixture on top of the silk to ensure that the fabric is uniformly saturated for maximum adhesion.
- Let the fabric dry without turning it over and putting weight on it. This seems counter-intuitive compared with other methods, but I have found the fabric dries more smoothly that way. Once dry, turn the panel face down and trim the edges using a blade, then lightly sand with a 400 grit sandpaper.
- Using a clean foam roller or brush, apply an even layer of GAC 100 size. “Feather” the surface with a very soft brush, then let dry overnight,
- Lightly sand, then apply a thin layer of acrylic gesso using brush strokes in one direction. Let dry overnight. Lightly sand and apply a second coat of gesso in the opposite direction, repeating this process if necessary until you get the surface you want.
- At this stage, you’re ready to paint or apply an oil ground.
I usually prep several panels at a time, and have a ready supply when inspiration strikes. I encourage you to give silk a try for a little variety in your painting surfaces!

Terry Rafferty says
Great description of your process, thanks for sharing.
My question is, by the time you coat the smooth silk with GAC and acrylic gesso, do you see any fabric weave at all? Why not simply gesso the aluminum panel directly (after sanding and alcohol prep)? I like painting on these panels and am willing to try something new – but am wondering how the surface is different. Thanks — Terry
Lisa Andrews says
Hello, Terry. Thanks for the reply. Yes, i definitely see some fabric weave after applying the GAC and acrylic gesso. You can certainly gesso the panel surface without this fabric step, but I wanted to find an appropriate alternative to a very expensive fine weave linen that would still have the “tooth” of a fabric surface.
Terry Rafferty says
Thanks – I’ll have to give it a try!
Dorothy Woolbright says
Wow! This is so interesting! Thank you for sharing it. I have yet to try something so fine as this silk but I do love the finer weaves of linen that are oil primed. This sounds like an interesting alternative.
Lisa Andrews says
Hi, Dorothy. I’m glad this inspired you. Over the years I have enjoyed trying many different weaves of linen (I gave up on cotton years ago—just didn’t like the feel of the weave), as well as acrylic vs. oil grounds. As I gravitated to finer and finer weaves, the idea of silk just seemed like a natural progression, stopping short of a plain gessoed panel. I hope you give it a try!
Doreen StJohn says
This is great information, Lisa…thank you!