We’ve all heard of the Golden Section, Dynamic Symmetry, the rule of thirds and harmonic armatures. And we’ve always been told to do a value study before we start a painting. However, in our rush to get started painting, many of us disregard it all and jump right in to putting brush to canvas.
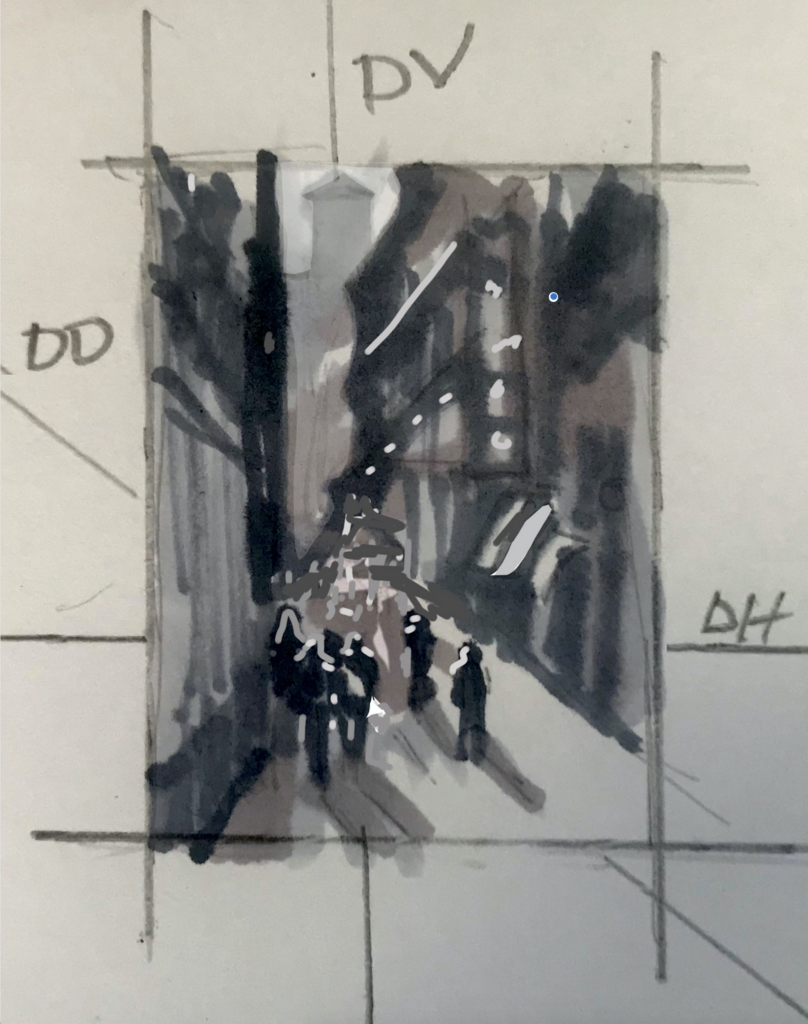
Six years ago, I made a pledge to NEVER skip a value study before plein air painting. Soon after, I learned how to design my pieces with a “thrust map” as well. This is a simple 2” study done on a 4”x6” index card with pencil or markers. I indicate the Dominant Vertical (DV), Dominant Horizontal (DH) and Dominant Diagonal (DD). Ideally where all of these lines meet will be my focal point.
Around the same time, I started studying Dynamic Symmetry with Victor Vargas of the Academy of Composition near Reading, PA. I studied with him for six months.
I had heard of the Golden Rectangle, and knew about the Golden Spiral, but I never learned WHY they were important. I received a BFA from Kutztown University in graphic design, and studied at PAFA, and never did a professor do more than mention them in passing.
DYNAMIC SYMMETRY AND THE FIBONACCI NUMBERS
After studying with Victor, I started using Root Rectangles, which I will explain later, and an underlying grid system.
In 2016 at the RMPAP event in Jackson, Wyoming, I painted the piece below using the new knowledge I had gained. During the opening event I received numerous satisfying comments from notable artists along the line of “I love the design of your piece”! They were comments I had not heard before. The piece also won an Award of Excellence. I was THRILLED and encouraged to delve more into this system of design.
2016, 18″ x 14″ – Oil
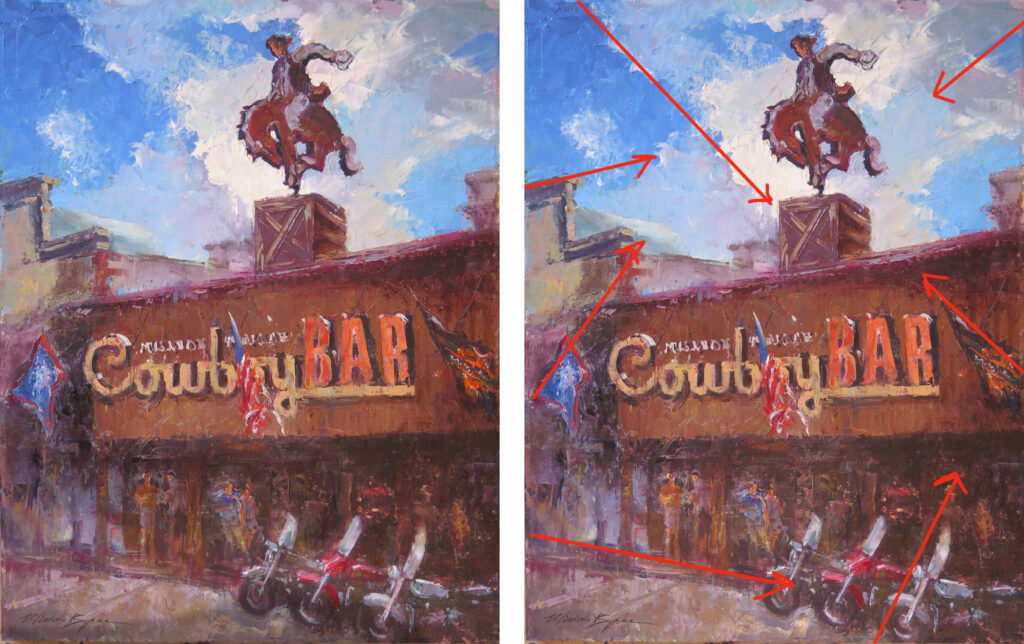
Directional lines pointing to focal point to move the viewer’s eye around the canvas
FIBONACCI SEQUENCE
I learned about the Fibonacci sequence and how it relates to the Golden Ratio. I am NOT a mathematician and could not relate to the algebra, but I was intrigued by the history of it, dating back thousands of years to Greek vase design and the Egyptian Pyramids. Visually, I understand the idea.
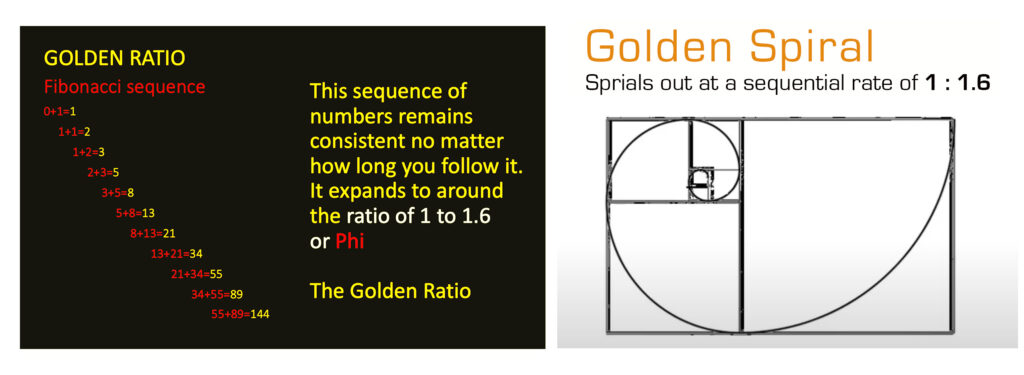
This sequence shows up constantly in nature. The number of petals on flowers are a Fibonacci number. The proportion of our bodies are in this ratio. For example, both the distance from our shoulder to our elbow, and the distance from elbow to tip of index finger is a ratio of 1 – 1.6.
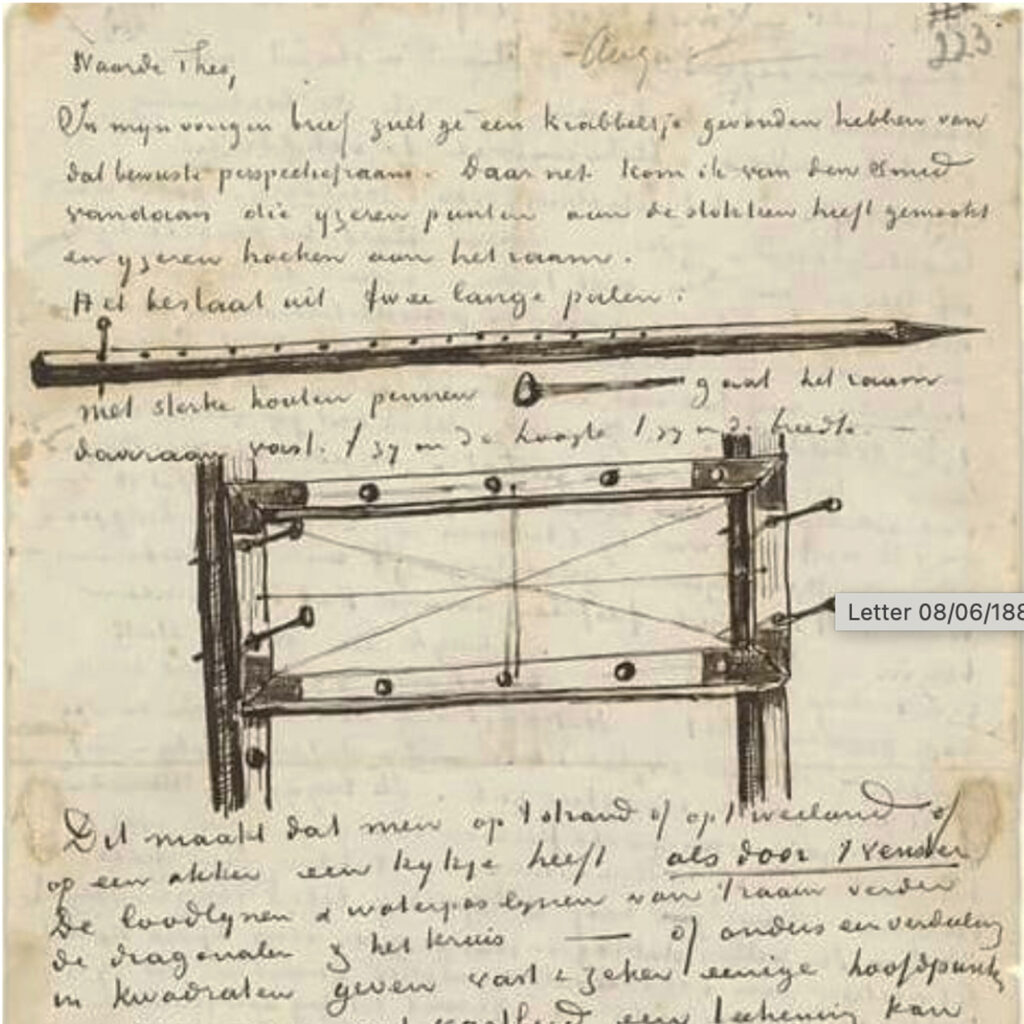
Michelangelo was said to have been obsessed with the spiral and used it in designing his paintings in the Sistine Chapel. Vincent Van Gogh wrote a letter to his brother Theo mentioning the simple grid system he used to design his paintings. He said he could paint with lightning speed once he had the design down.
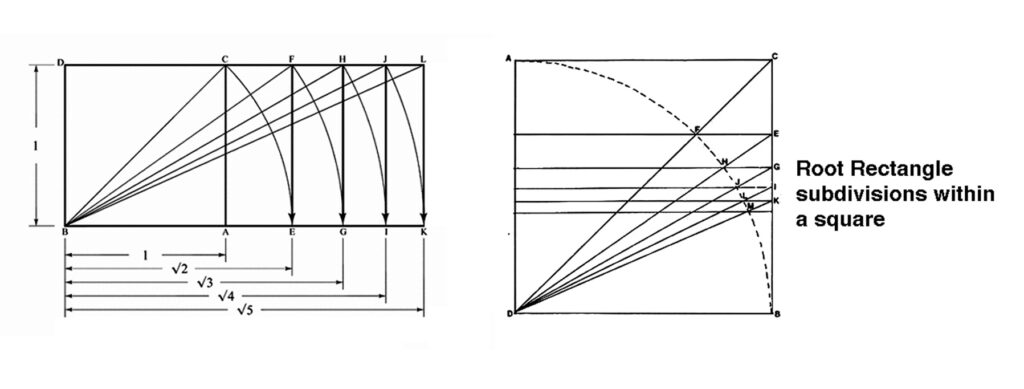
Root rectangles are made from the Fibonacci sequence to form the basic rectangles shown above.
The problem with using Root Rectangles in our artwork is that they are not used in today’s standard size canvases and frames. Why not? It’s a controversial subject and you can read endless articles on the internet.
In today’s world neither movie screens, iPhones, televisions computer screens, etc. are using Root rectangles. (Perhaps we have become too out of tune with nature?) Only a few standard sizes fall into root rectangles and they are shown below.
5×7 – Root 2
8×10
9×12
12×16
11×14 – Root Phi
12×24 – Root 4
16×20
18×24
24×36
For some of my larger studio work, I use root rectangle-sized canvases and have custom 22K gold gilt frames made for them. However, for quick plein air paintings and studies, I do not want to cut my own panels or order custom frames. Therefore, I decided to adjust the grid system to standard sizes for plein air painting. After learning how to design the grid, I adapted it to 8” x 10, 9” x 12” and any other size I chose to use.
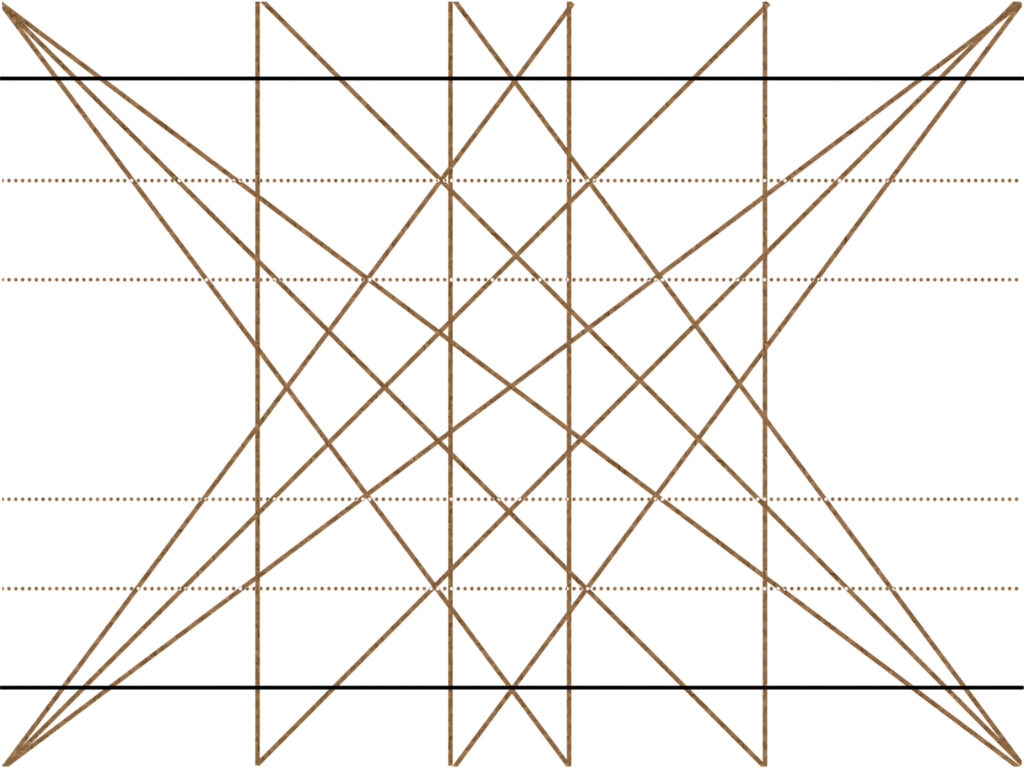
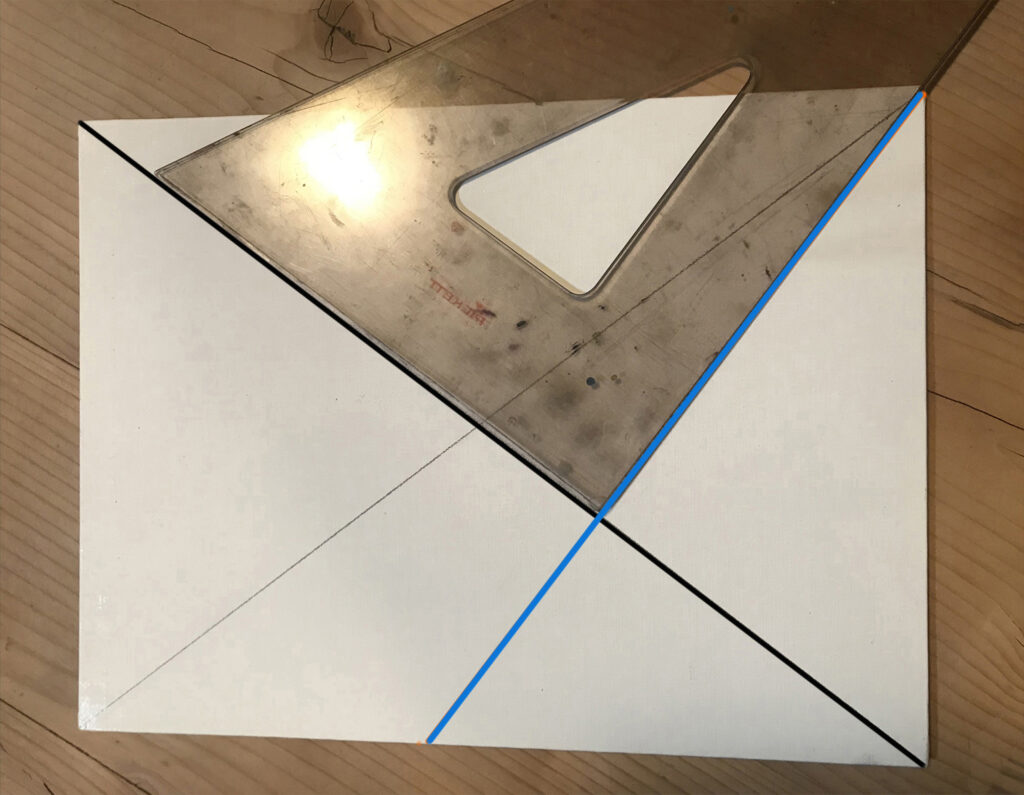
DESIGNING THE GRID
The only tools you need are a pencil, ruler and T-square or triangle. It seems complicated at first, but after a while, it will come more easily. You can adapt this grid to any size. Below is the grid for 9 x 12, 12 x 16, 18 x 24, etc.
For the first time this year, I taught back-to-back workshops at the Booth Art Academy (GA) and the Center for the Arts in Bonita Springs (FL). I decided to attempt to teach this grid system because so many artists were inquiring about my grids shown on social media. Each class was full with 15 students and most were having a hard time understanding the process. When class was over, I asked them to vote if they would have preferred the class with or without the grids taking up a lot of their time. The grid system had not been on the class description. Every single student said they loved learning this new system and were anxious to try it out on their own!
While at the Booth Western Art Museum, I gave a PowerPoint presentation on how I use this system in my work. The presentation, which goes into more depth about gridwork and thrust maps, is available to view on the Booth Facebook page or on my YouTube channel which you can find at this link: https://www.youtube.com/watch?v=HPV4cDXFzoI&t=746s
EXAMPLES OF PIECES CREATED USING THIS SYSTEM
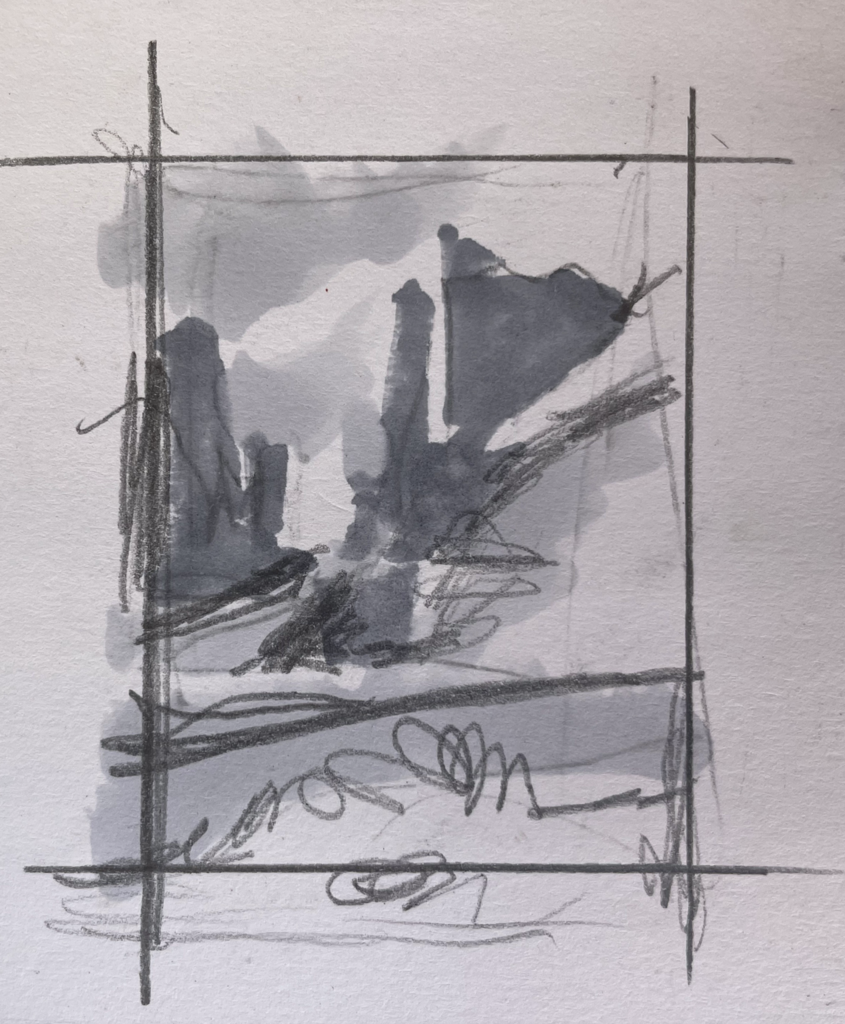
Shown below is a plein air painting I did this past September in Arches National Park near Moab, Utah.
(The rough value study is pictured at the beginning of this blog article.) There was a grid drawn on the 14” x 11” (root phi) panel before I started. The grid helps with placement. After I establish the placement in the under painting, I am free to let loose and have fun.
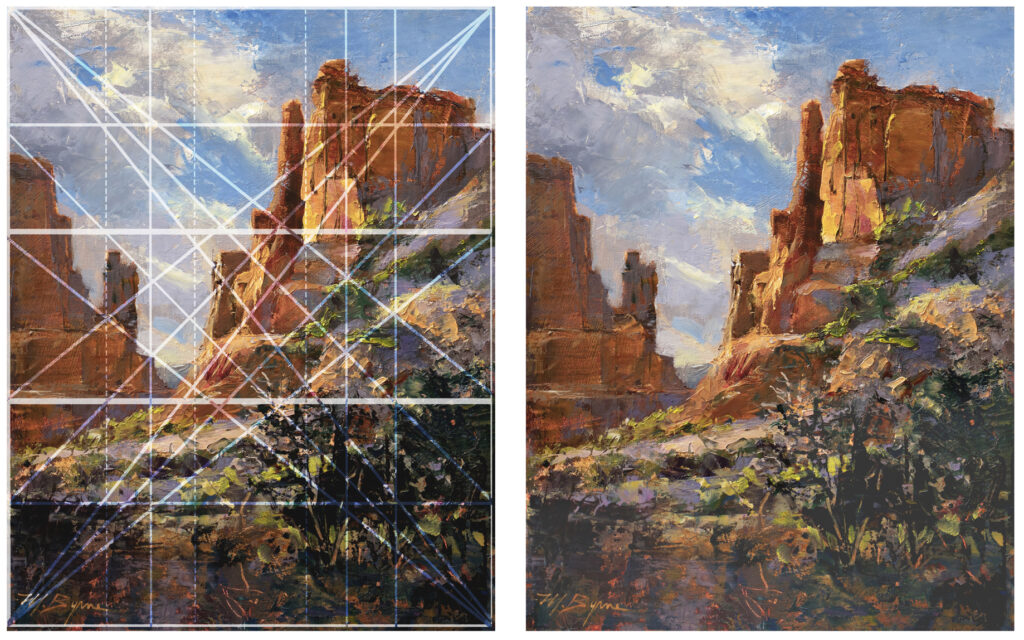
Arches Morning Light by Michele Byrne
14” x 11” – Oil, Root Phi Grid
The grid above is placed over the painting to illustrate my thought process.
“Sunlit Street of Rome” – 12” x 9” was painted as a demo during an online Zoom class I taught last year. The much more detailed value study shown above (at the beginning of this article) was done to show the students exactly what I had in mind for the piece before I started.
The grid is a great help when painting the underpainting in my studio practice. It also helps when drawing complex scenes like cityscapes.
This piece won the IMPRESSIONIST AWARD at the OPA Salon Show last year.
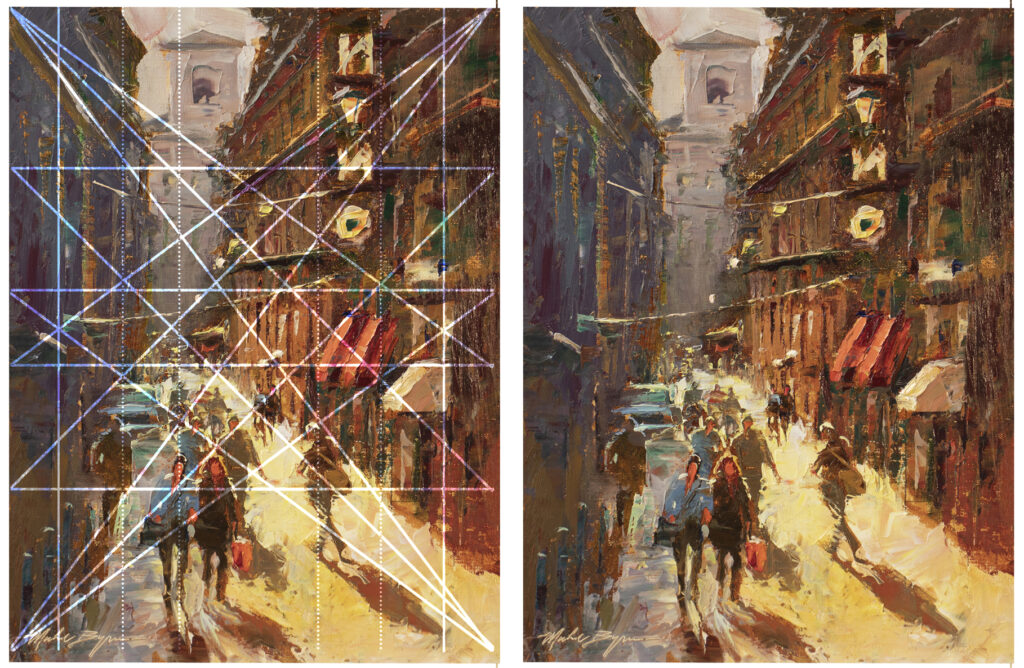
12” x 9” – oil on panel using my own altered grid
You may think this is a lot of unnecessary work, too complicated and not for you. I probably would have thought the same thing 10 years ago.
It’s a few extra steps in the beginning I must admit. However, I draw the grids on my standard-sized panels the night before painting. Having a grid helps me decide the placement of compositional elements such as the horizon line or mountain. In cityscapes, a grid helps me decide where to put the vertical side of a building, or where to place the figure. For me it sets a starting point. Once I start passionately painting in the thick juicy paint, the grid disappears. Only I know It was ever there. I’ve used the grid so long now that even when I don’t have a grid on the canvas, I can still visualize exactly where it would be.
Understanding the Fibonacci Sequence and root rectangles, and using the grid system has strengthened the design of my paintings, which my collectors and galleries appreciate. And I love sharing this knowledge with students so they can produce stronger work as well.