As artists, we tend to accumulate frames that just don’t quite work. They may have gotten damaged being shipped to a gallery, or banged around being transporting to a show. Maybe they were “ok” frames, but the finish just wasn’t up to gallery standards, or the color didn’t compliment the art.
There are many ways to bring new life back to those old frames so they can come out of storage and proudly showcase your best art!
I have been a fine art restorer for over 35 years and have learned many tricks about repairing damaged frames that I would like to share. Most artists have the ability to refurbish their own frames, but they lack the know-how. Being able to modify your frames can not only save thousands of dollars, but can open a whole new opportunity to individualize and modify frames to be one of a kind pieces that will enhance your art.
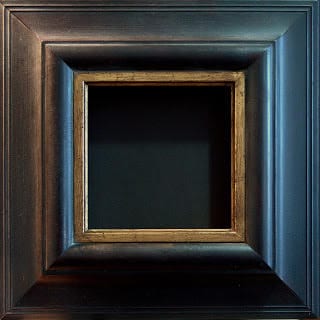
I am going to give a step-by-step guide to create a lovely, hand-rubbed, soft black finish. These same steps can be used to modify an existing finish, or be used with other base colors (not just black). So have fun and get creative!
A friend and wonderful artist, Connie Kuhnle, has used some beautiful, soft, greyed colors for her plein air landscapes. One of my favorites is her antiqued mustard yellow frame on a white and yellow farmhouse scene…sheer perfection!!
I often use antiquing and waxing to add interest to a newly purchased frame that just doesn’t quite have the richness I desire. It is a fairly quick and simple step that can make a remarkable difference.
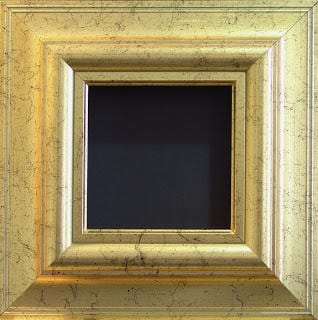
Frame Makeover
Supply list for warm black antique finish:
- Black paint — I use semi gloss spray enamel, but any good quality, black acrylic enamel paint will work. You can use a brush-on, although you may find that you have some texture of the brush strokes in the finish. They may not be objectionable, depending on the finish you want.
- Red paint — (optional)…same as the black. Used to create a red undertone.
- Fine steel wool
- Fine 280 grit sandpaper
- Antiquing stain…raw umber oil paint will work, as will acrylic. you can also purchase a stain, like Minwax, in a dark walnut color.
- Rottenstone
- Wax or polish for wood (I like “Bison” Black ebony best)
- Hammer with a claw side
- Polyurethane wood finish, semi-gloss, brush or spray
If an antique white frame is desired, you will need white paint in place of black. This same finish works beautifully with a color as well.
- Lightly sand original finish to cut the gloss a little and allow for better adhesion of the new paint.
- Pound the frame casually, bouncing the claw-side of the hammer over the surface to create even (but not too uniform) scars and indentations if you want a more antique look.
- If red undertone is desired, spray (or brush) on red paint. Allow to dry as per instructions on the paint.
- Lightly rub with steel wool
- Spray (or brush) on black enamel and allow to dry.
- Use sandpaper on edges and across the surface to allow some red to show through and give a “worn” look to the finish. It is going to look best if you have fairly even streaking throughout the frame. If the streaking is not even, the frame will look splotchy.
- Apply raw umber antiquing with a wide brush and wipe with a soft rag, paper towel, or cheesecloth to remove some, but not all, of the antiquing. Allow stain to remain in the crevices as well as the indentations that you made. Allow to dry.
- Spray or brush with polyurethane finish to seal. Allow to dry.
- Apply polishing wax and allow it to dry, then buff to a nice hand-rubbed luster.
- Dust lightly with rottenstone…especially in crevices and detailing of frame. Buff again.
While the written steps may appear time consuming, they really are not. It is important to give each of the finish layers time to dry, so from start to finish, it will take a couple of days, but actual working time on the frame shouldn’t be more than an hour or two. With practice, you will find it easier and easier to achieve the results you are after and start adding your own variations to create one of a kind finishes!

12″ x 12″ – Oil
12″ x 12″ – Oil
Marsha Hamby Savage says
Thank you for these fantastic step-by-step instructions. I have so many frames that have a nick here or there due to the galleries sliding them in and out of bins. They try their best I know. And, some frames I no longer like so I can’t wait to try some of the techniques you discussed.
David Henderson says
I really enjoyed this article. In a group of fellow artists, I’ll often be the only one to bring up the dreaded subject of “framing”. Of course, as a gallery artist, all my work must be delivered framed, and the kind of frames I often use will be ornate, gilded antiques. I will wind up recasting parts directly from the frame, gilding and aging to make them gallery-ready. I started restoring more when I joined another gallery a few years ago, and these unusual frames mostly hold, well…rabbits and other creatures..
Jenny McKinnon Wright says
Yes! This was so enlightening and definitely doable. Please, more how-to for frame makeovers! We all need this!
Thank you for giving us courage and tips to save these expensive frames for a new look!
Jenny McKinnon Wright
mrs karen cooper says
This is a GREAT article. I have attempted some frame makeovers, but could not get the rich sheen part . Now I know how.
(Going to have to google rottenstone though – never heard of that one 🙂 )
Thanks so much for sharing all this info
Karen
karencooperpaintings.com
Lynn Wade says
I think Google just crashed from all of us looking up “Rottenstone”. 😀
Sam Robinson says
This is a very useful topic, presented clearly and simply! In addition to my fine art studio, I also own a decorative painting company, and you can easily imagine the many variations on frame finishes available with that expertise. Lots of other effects are quick and easy to do, and a bit of research will add to your range of options. My only caution is that the single biggest problem with inexpensive frames is that the structure is poor and corners will open, knots and random cracks will appear, and the underlying finish will flake off. No amount of additional finish work will solve those problems, so be careful what you put effort into.
Wilma Bradner says
Sounds good. What is the purpose of the rotten stone and where can it be purchased??
Bev Nelson says
With several frames awaiting up-dating, the article with before/after photos captured my attention immediately. The individual painting steps were well orchestrated. However, I was disappointed that there was not a photo of the make-over during each step. In my opinion that would have made the article much more helpful.
Thank you, though for showing us what a first-rate makeover can do for an old frame.
Keep the interesting blogs coming!
Karen michmerhuizen says
Excellent!
Jenny Eindsor says
Great informative. It is much appreciated and will be out to use.
Marney-Rose Edge says
Wow great information. Thank you so much. my only question is What is Rottenstone?
Thanks again
Sandra says
Wonderful! Thanks so much for sharing this. I am anxious to try it on some of my less than great frames!
Margret E Short says
Hello Barbara,
Thank you so much for this post as it is very timely. My painting that came back from the last exhibit had a sizeable chunk gouged out of one corner. I have refurbished old frames in the past but I’m always at a loss as to the correct finishing process. I will try your technique and see if I can salvage some damaged frames to gallery standards.
Thanks again,
Margret Short
Rick Rotante says
Ms. Schilling offers some good tips. If you paint as much as I do, you are constantly exchanging artwork and frames when necessary. Not all frames work with all artwork.
Having many frames sitting around increases an artists overhead. Cost money.
Plus, as she says, shipping or carrying work to shows, frames get banked up.
I have been refurbishing frames for years. I have used similar techniques which Ms. Schilling has suggested. They work.
One advantage for me is I was a carpenter and build furniture. But it isn’t hard to do.
Try it. Take advantage of these tips. Saves money and frustration. Good luck
Fran Wood says
I’ve had a couple of very amateurish results trying to spiff up unremarkable frames, so I’m delighted to know the formula for success. Thank you!! I can’t wait to try this method !!
Vic says
I have always wondered how to fix some of my frames. I have a box full of them. This was so helpful.
Cindy Compert says
Great article! Now I know what to do with all my leftover spray paint. One tip is to make sure you let each layer dry per the instructions. If you don’t wait long enough, you run the risk of the surface wrinkling and lifting. Not fun! I’ve learned the hard way.
Alisann says
I love going to thrift stores, etc to find old frames and then refinish them for my artwork. And when the client asks, where did I get the frame? I say “It is a Vintage frame.” I love the finishes that I get from Melange. My daughter, who refinishes vintage furniture, told me about them. They have amazing colors. Easy to use. And they have antiquing waxes as well.
Alejandra Hucek says
Thank you !
Suzanne LeBeau says
If it’s at ALL wobbly, square it up and reinforce the corners. You can rub a bit of wood filler in the corner seams for a better quality end result BEFORE doing all this other work, too. I actually enjoy working on frames more than the art now!